I mentioned a few posts back that I really wanted to try my hand at making Stuffed Letters. This was a total, typical Kris moment of "I think I can just do it so I will" - there's always bound to be a learning experience in there somewhere - this project was no exception to that!
I started by first drawing out the letters to my daughter's name. It took a while for me to figure out exactly how I wanted them to look (you can see the lines showing through the back of a rejected style). I would make the letters thicker, were I to do this again. You'll see why later on,
Once the letters were drawn, I cut them out and began.
I folded my washed and ironed (see I've already learned a little about working with fabric) fabric in half (good side out each way). I pinned the letter to it and cut that out.
I then removed the pins, separated the 2 letters, flipped them over, re-matched them so that the rough sides were now facing out and re-pinned.
Then I began sewing all the perimeter, leaving a gap in one part for the later steps of turning the material inside out and stuffing everything.
*side note #1 - don't sew the middle hole of a letter like A - it doesn't work to flip it inside out
*side note #2 - I experimented a bit with how to turn the material when sewing so I didn't have to start and stop and re-start with every angle. I think I figured out how to do it, but if any of you sewers have tips for me as the the proper way to do that, that would be great.
*side note #3 - If I did this again with the letter A I would leave 2 gaps for stuffing - one on either 'foot' of the A - I ended up ripping out one the foots as I could get the stuffing to go around corners very well.
Get ready to flip the material inside out, so that the good side is now showing.
Here's everything turned around.
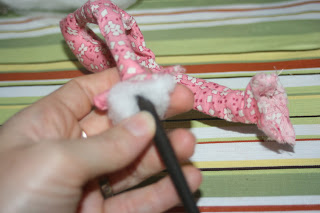
Now stuff - I found a chopstick very hand for this part.
Now sew the stuffing holes shut and you have a stuffed letter. On further reflection, I wish I had picked another letter of my daughter's name to show you all, because of all the problems the letter A gave me, it looks a little wonkier than I would have liked, but the final project of all the letters together looks great.
*Update: I posted on "How to Make O's, A's and other tricky letters" check it out here!


This gives me a great idea for Christmas presents for the kids! :) I've been meaning to make name pillows with a pattern that I won once.
ReplyDeleteAny ideas on how to make the letter O !!! Failed miserably so far, lol :( Thanks
ReplyDeleteTo make a letter "o" you must cut one side completely through so you now have a circular tube. Stuff and tuck in your raw edges and then hand sew around. Yes that means one side of your "o" will be a bit shorter so if you wanted to plan ahead you could cut it larger on one side. I struggled with this one a few years ago, and forgot how to turn "A" thats why I'm on this site.
ReplyDelete