

Thursday, October 28, 2010
Getting Organised
Wednesday, October 27, 2010
Look what came in the mail!

Isn't this the most adorable thing? This my friends is my first etsy purchase. I got it from Sibling Arts. This is their Great Aunt Lindy Paper Dolls, doll set. And they are so cute! My mom made me similar kinds of dolls but Strawberry Shortcake ones when I was little. These dolls are for my daughter and I am so looking forward to making them!
Sunday, October 24, 2010
My Teapot has a new hat!

Tuesday, October 19, 2010
My Creative Son

My letters are up

Sunday, October 3, 2010
Making Stuffed Letters
I mentioned a few posts back that I really wanted to try my hand at making Stuffed Letters. This was a total, typical Kris moment of "I think I can just do it so I will" - there's always bound to be a learning experience in there somewhere - this project was no exception to that!
I started by first drawing out the letters to my daughter's name. It took a while for me to figure out exactly how I wanted them to look (you can see the lines showing through the back of a rejected style). I would make the letters thicker, were I to do this again. You'll see why later on,
Once the letters were drawn, I cut them out and began.

I folded my washed and ironed (see I've already learned a little about working with fabric) fabric in half (good side out each way). I pinned the letter to it and cut that out.

I then removed the pins, separated the 2 letters, flipped them over, re-matched them so that the rough sides were now facing out and re-pinned.


Then I began sewing all the perimeter, leaving a gap in one part for the later steps of turning the material inside out and stuffing everything.
*side note #1 - don't sew the middle hole of a letter like A - it doesn't work to flip it inside out
*side note #2 - I experimented a bit with how to turn the material when sewing so I didn't have to start and stop and re-start with every angle. I think I figured out how to do it, but if any of you sewers have tips for me as the the proper way to do that, that would be great.
*side note #3 - If I did this again with the letter A I would leave 2 gaps for stuffing - one on either 'foot' of the A - I ended up ripping out one the foots as I could get the stuffing to go around corners very well.

Get ready to flip the material inside out, so that the good side is now showing.

Here's everything turned around.

Now stuff - I found a chopstick very hand for this part.
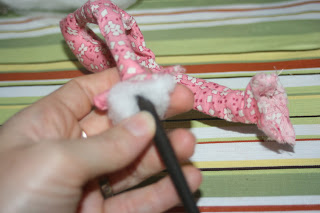
Now sew the stuffing holes shut and you have a stuffed letter. On further reflection, I wish I had picked another letter of my daughter's name to show you all, because of all the problems the letter A gave me, it looks a little wonkier than I would have liked, but the final project of all the letters together looks great.
 *Update: I posted on "How to Make O's, A's and other tricky letters" check it out here!
I started by first drawing out the letters to my daughter's name. It took a while for me to figure out exactly how I wanted them to look (you can see the lines showing through the back of a rejected style). I would make the letters thicker, were I to do this again. You'll see why later on,
Once the letters were drawn, I cut them out and began.

I folded my washed and ironed (see I've already learned a little about working with fabric) fabric in half (good side out each way). I pinned the letter to it and cut that out.

I then removed the pins, separated the 2 letters, flipped them over, re-matched them so that the rough sides were now facing out and re-pinned.


Then I began sewing all the perimeter, leaving a gap in one part for the later steps of turning the material inside out and stuffing everything.
*side note #1 - don't sew the middle hole of a letter like A - it doesn't work to flip it inside out
*side note #2 - I experimented a bit with how to turn the material when sewing so I didn't have to start and stop and re-start with every angle. I think I figured out how to do it, but if any of you sewers have tips for me as the the proper way to do that, that would be great.
*side note #3 - If I did this again with the letter A I would leave 2 gaps for stuffing - one on either 'foot' of the A - I ended up ripping out one the foots as I could get the stuffing to go around corners very well.

Get ready to flip the material inside out, so that the good side is now showing.

Here's everything turned around.

Now stuff - I found a chopstick very hand for this part.

Now sew the stuffing holes shut and you have a stuffed letter. On further reflection, I wish I had picked another letter of my daughter's name to show you all, because of all the problems the letter A gave me, it looks a little wonkier than I would have liked, but the final project of all the letters together looks great.

Went Fabric shopping - Here's what I bought
I had a lovely day off last Monday. My mom and Nana were in town and took my middle child out for the day. My oldest child was at school. My husband was at the University so it was just me and my baby girl. I really was overwhelmed with the possiblities that lay before me. I seldom get quiet time (not counting my hour before bed). I decided to go shopping. I went back to Sew Sisters. It was so nice to go with time. I'm still new at sewing, but extremely inspired. There were 2 fabrics that caught my eye the last time I was in, but with my boys and their energy abounding I really didn't get to have a good browse. I found the first fabric and ones complimentary to it wrapped up in a fat quarter package. How could I resist?
 Okay, well, really only 5 of these fabrics were in the original packet. I found a few more that matched and got them too and then put them altogether once I was at home. But aren't they pretty? I don't know what I'm going to do with them yet.
 The real reason I came back was to take another look at this bee fabric. I really, really like it. I like it so much that I found other fabrics that I think go with it. And once I get a better feel for sewing, I have these fabrics planned into my first, me-designed-not-following-a-quilt-kit-quilt. I'm so excited about this. And nervous. But I look forward to it. I like creating and being able to look at something and thinking, "I made that".


Giveaway Alert
I love the blog world community. You have friends who blog who have other friends who blog who have friends that you just know from their blog. This is one of those stories with a happy ending of a giveaway. Visit Me and My 2 guys to find a great giveaway going on now! Right now - here
Subscribe to:
Posts (Atom)